Programming
Use the links below to explore our 3 titles:
Vision
Overview
We use limelights for object detection for cubes and cones as well as odometry.
Limelight
The limelight is how our robot gets vision. It allows pose estimation and movement based on the position of our robot. We use multiple pipelines to track different things, for example, our pipeline 2 allows us to track cubes while our pipeline 4 tracks april tags. It is important to tweak variables on the limelight dashboard to optimize tracking and recognition. When tracking the cube, turning up the exposure allows the limelight to detect its color. Yet, when tracking apriltags, we turn down the exposure to improve our motion-blur resilience.
Vision Odometry
Using our limelights, we could track our robot’s position based on the april tags around it. We implemented the position estimator so that we could add vision to our odometry, which estimates the position of the robot on the field. It is important that the limelight is higher or below the april tags, because being head-on causes “tag-flipping”. Also, when practicing with the april tags, it is important to make them as flat as possible. One of the problems were how our robot kept showing on the botton left corner. To implement field2d, we had to change the x and y field offsets for the vision coordinate system to work with the field2d coordinate system. The field2d coordinate system has bottom left as the origin, while the limelight helpers.java uses the middle of the field as the origin. We used limelight helpers, link below, for our limelight apriltag odometry. https://github.com/SterlingHS/ChargedUP2023/blob/main/src/main/java/frc/robot/LimelightHelpers.java
     /**
     * Have modules move towards states and update odometry
     */
    @Override
    public void periodic() {
        if (!DriverStation.isTest()) {
            runModules();
        }
        // odometer.update(gyro.getRotation2d(), getModulePositions());
        poseEstimator.update(gyro.getRotation2d(), getModulePositions());
        Pose3d sunflowerPose3d = sunflower.getPose3d();
        if (sunflowerPose3d != null) {
            poseEstimator.addVisionMeasurement(sunflowerPose3d.toPose2d(), Timer.getFPGATimestamp());
        }
        field.setRobotPose(poseEstimator.getEstimatedPosition());
    }
Above is a picture of how we implement the vision readings to the swerve odometry. Sunflower is the class we use to create a Pose3d of our robot’s location based on the LimelightHelpers.java file.
Drive to Object
Cube to move the robot is going to move to cube. So, use this to move is good. I think that we upgrade the robot. Drive to object uses the limelights to detect the color of the cube. We haven’t made our robot move to the target yet, but we have the x and y values for speed.
Swerve Updates
Overview
Last year, our swerve drive code was written really badly, and had lots of issues.
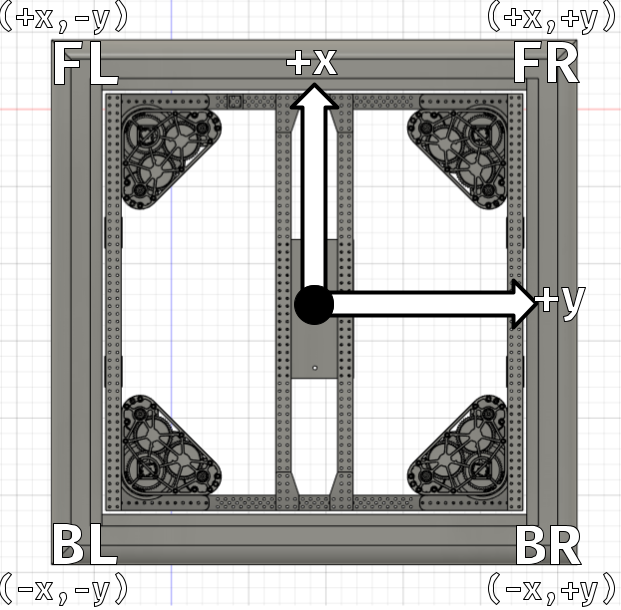
One of the largest issues that prevented us from making proper autos was the orientation of our swerve drive. Our old swerve drive code followed the North, East, Up convention, which can be seen below:

This can be seen in our code:
public static final SwerveDriveKinematics kDriveKinematics = new SwerveDriveKinematics(
      new Translation2d(kWheelBase / 2, -kTrackWidth / 2),  // Front Left (x, -y)
      new Translation2d(kWheelBase / 2, kTrackWidth / 2),   // Front Right (x, y)
      new Translation2d(-kWheelBase / 2, -kTrackWidth / 2), // Back Left (-x, -y)
      new Translation2d(-kWheelBase / 2, kTrackWidth / 2)); // Back Right (-x, y)
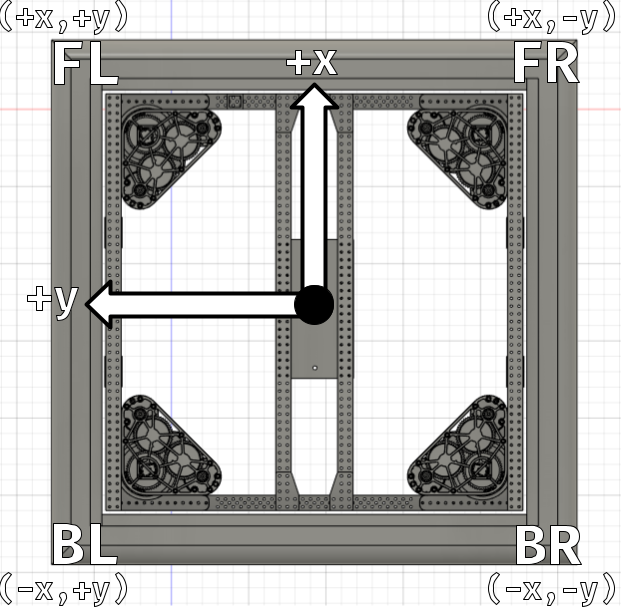
However, the swerve drive kinematics class in WPILib actually follows the North, West, Up convention:

This should have caused all of our wheels to become flipped horizontally (across the x-axis), as the front right module was being treated like the back right module and vice versa. This would make the swerve drive undrivable, as when rotating, it would cause the modules to get stuck in an “X” shape.
However, we made another mistake that perfectly cancelled this out.
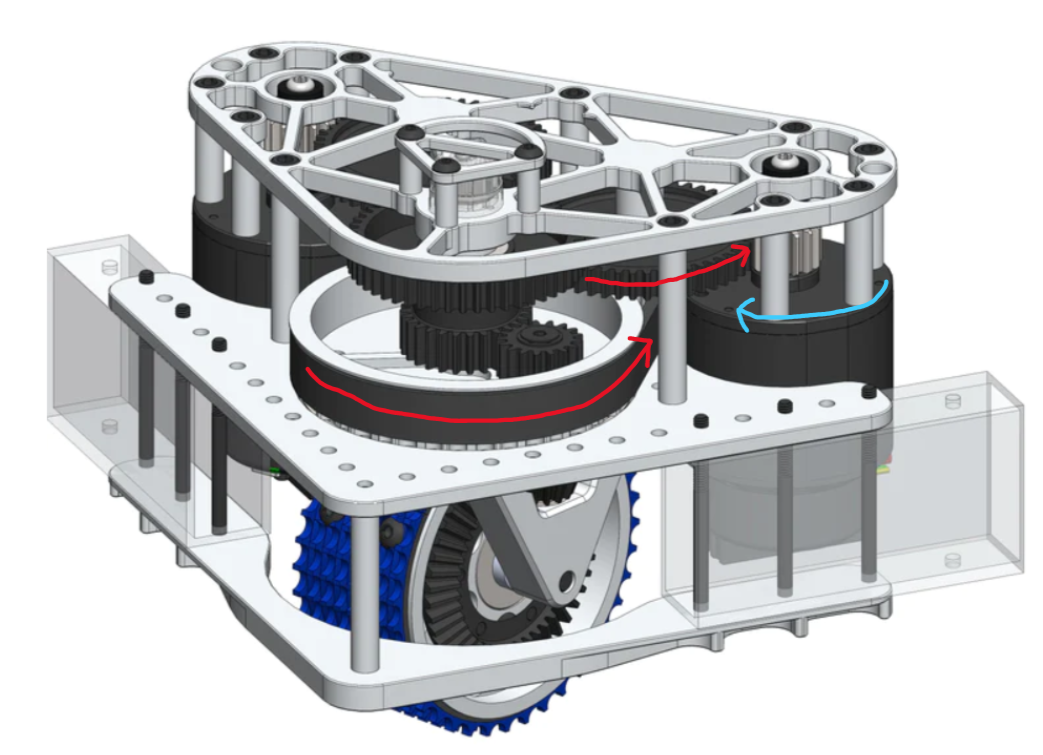
Because of the way Falcon 500 motors are mounted in Mk4i Swerve Modules, a clockwise rotation in the falcon 500 results in a clockwise rotation of the entire swerve module:

Because we didn’t invert our Falcons, this “un-flipped” the reversed module rotations.
However, this would cause the CANCoders in our modules to read different angles due to reading as Counter-Clockwise positive, causing us to invert our CANCoders.
We can see the impact of these messed-up coordinate conventions in our code. For example, our module “tow” states, which is where all of the swerve modules turn inwards to lock the entire drivetrain in place, has clockwise-positive angles, instead of counterclockwise-positive angles.
public static final SwerveModuleState[] towModuleStates =
    new SwerveModuleState[] {
        new SwerveModuleState(0.01, Rotation2d.fromDegrees(45)),  // Front Left
        new SwerveModuleState(0.01, Rotation2d.fromDegrees(135)), // Front Right
        new SwerveModuleState(0.01, Rotation2d.fromDegrees(-45)), // Back Left
        new SwerveModuleState(0.01, Rotation2d.fromDegrees(-135)) // Back Right
    };
Fixing the Problem
By the time we realized this problem during the 2023 season, it was too late for us to change our swerve drive code, as we were already mid-season and didn’t want to spend our testing time fixing this problem. This ended up being a bad decision, as it stopped us from making any complex autos, and caused weird behavior when moving backwards in autos.
As a result, as soon as offseason started, the very first thing we did was create a fork of our ChargedUp2023 code called SwerveDrive2023, where we would fix these issues and make a reusable swerve drive template for ourselves.
To fix our issues, we implemented the following changes:
Switch to North-West-Up conventions in our Swerve Drive Kinematics class
Invert our Falcon 500s
Un-invert our CANCoders
Modify hard-coded states
Implementing these changes solved our issues with a flipped drivebase, and allowed us to properly use autonomous trajectory libraries such as PathPlanner. You can read more about how we used PathPlanner in the Autos section.
State Control
One issue with our past implementation of our Swerve Drive came from how the modules were controlled.
In our original code, we set the desired state of each module and controlled the modules to move towards the state in the same method, setDesiredState:
/**
 * Set the desired state of the Swerve Module and move towards it
 * @param state The desired state for this Swerve Module
 */
public void setDesiredState(SwerveModuleState state) {
    if (Math.abs(state.speedMetersPerSecond) < 0.001) {
        stop();
        return;
    }
    state = SwerveModuleState.optimize(state, getState().angle);

    desiredAngle = state.angle.getDegrees();

    currentPercent = state.speedMetersPerSecond / SwerveDriveConstants.kPhysicalMaxSpeedMetersPerSecond;
    driveMotor.set(ControlMode.PercentOutput, currentPercent);

    double turnPower = turningController.calculate(getTurningPosition(), state.angle.getRadians());
    turnMotor.set(ControlMode.PercentOutput, turnPower);
}
Although this works for teleoperated input, as the drive command will constantly be sending new states to the swerve modules, one issue comes from autos.
At the end of our dock and engage autos, we would “tow in” the modules, or put them in an X-shape so that the swerve drive does not slide off the charging station. For example, in our preload taxi dock and engage auto:
public static CommandBase preloadTaxiChargeBackwardsSLOW(SwerveDrivetrain swerveDrive, MotorClaw claw, Arm arm, Elevator elevator) {
    return sequence(
        deadline(
            waitSeconds(13.5),
            sequence(
                ChargeAutos.preloadHigh(arm, elevator, claw),
                deadline(
                    taxiChargeBackwardsSLOW(swerveDrive),
                    run(() -> arm.moveArmMotionMagic(elevator.percentExtended())),
                    run(() -> elevator.moveMotionMagic(arm.getArmAngle()))
                )
            )
        ),
        runOnce(() -> swerveDrive.towModules()), // Set the module states to towed in
        waitSeconds(0.2),
        runOnce(() -> swerveDrive.stopModules())
    ).finallyDo((x) -> swerveDrive.getImu().setOffset(180));
}
The problem with this is that the PID controller for turning the modules to their target position is only running once. This causes the wheels to all start spinning to start going towards the tow position, but not slow down.
To fix this issue, we separated setDesiredState into two different methods:
public void run() {
    desiredState = SwerveModuleState.optimize(desiredState, Rotation2d.fromRadians(getTurningPosition()));

    desiredAngle = desiredState.angle.getDegrees();

    double velocity = desiredState.speedMetersPerSecond / ModuleConstants.kDriveTicksPer100MsToMetersPerSec
                                                        / ModuleConstants.kDriveMotorGearRatio;
    this.desiredVelocity = velocity;

    if (this.velocityControl) {
        driveMotor.set(ControlMode.Velocity, velocity);
        this.currentPercent = 0;
    } else {
        this.currentPercent = desiredState.speedMetersPerSecond / SwerveDriveConstants.kPhysicalMaxSpeedMetersPerSecond;
        driveMotor.set(ControlMode.PercentOutput, this.currentPercent);
    }

    double turnPower = turningController.calculate(getTurningPosition(), desiredState.angle.getRadians());
    currentTurnPercent = turnPower;

    turnMotor.set(ControlMode.PercentOutput, turnPower);
}

public void setDesiredState(SwerveModuleState state) {
    if (Math.abs(state.speedMetersPerSecond) < 0.001) {
        state.speedMetersPerSecond = 0;
    }

    this.desiredState = state;
}
By separating setDesiredState() into run() and setDesiredState(), we avoid issues with the swerve modules not properly moving towards the desired state, as run() will always be run in the periodic method of SwerveDrivetrain.java, except when in test mode:
/**
 * Have modules move towards states and update odometry
 */
@Override
public void periodic() {
    if (!DriverStation.isTest()) {
        runModules();
    }

    poseEstimator.update(gyro.getRotation2d(), getModulePositions());

    // Vision pose estimation
    if (sunflower.getPose3d() != null) {
        poseEstimator.addVisionMeasurement(sunflower.getPose3d().toPose2d(), Timer.getFPGATimestamp());
    }
}
Cube Shooter Robot
Overview
The cube-shooter is the robot we plan on using at the upcoming off-season competition Chezy-Champs. The purpose of it is to pick up cubes as the robot drives into them, allowing for quick intake, and then shooting the cube back out into either the low, mid, or high shelves.
Code Review
Adding Logging to the Wrist
    public void initShuffleboard(LOG_LEVEL level) {
        if (level == LOG_LEVEL.OFF || level == LOG_LEVEL.MINIMAL) {
            return;
        }
        ShuffleboardTab tab = Shuffleboard.getTab("Wrist");
        switch (level) {
            case OFF:
                break;
            case ALL:
                tab.addNumber("Motor Output", wrist::getMotorOutputPercent);
                tab.addString("Control Mode", wrist.getControlMode()::toString);
                tab.addNumber("Wrist Target Velocity", wrist::getActiveTrajectoryVelocity);
                tab.addNumber("Closed loop error", wrist::getClosedLoopError);

            case MEDIUM:
                tab.addNumber("Wrist Current", wrist::getStatorCurrent);
                tab.addNumber("Wrist Velocity", wrist::getSelectedSensorVelocity);
                tab.addNumber("Wrist Voltage", wrist::getMotorOutputVoltage);
                tab.addNumber("Wrist Percent Output", wrist::getMotorOutputPercent);

            case MINIMAL:
                tab.addNumber("Current Wrist Ticks", wrist::getSelectedSensorPosition);
                tab.addNumber("Target Wrist Ticks", () -> targetTicks);
                tab.addBoolean("At target position", atTargetPosition);
                break;
        }
        }
As seen in this code segment we added logging to the cube shooter code. We created a new tab in Shuffleboard called “Wrist” then used the loggingLevel contsant we created to seperate the logs into different sections for the wrist. Depending on if the loggingLevel is OFF, ALL, MEDIUM, or MINIMAL, Shuffleboard will only show the tabs listed under each case, this way we reduce the amount of logs we used depending on what is needed.
Creating Shooter
public Shooter() {
        TalonFX leftMotor = new TalonFX(ShooterConstants.kLeftMotorID);
        TalonFX rightMotor = new TalonFX(ShooterConstants.kRightMotorID);
        leftMotor.setInverted(false);
        rightMotor.setInverted(true);
        leftMotor.setNeutralMode(NeutralMode.Brake);
        rightMotor.setNeutralMode(NeutralMode.Brake);
        leftMotor.configVoltageCompSaturation(11);
        rightMotor.configVoltageCompSaturation(11);
        leftMotor.enableVoltageCompensation(true);
        rightMotor.enableVoltageCompensation(true);
    }
public CommandBase outtake() {
        return sequence(
            setPower(ShooterConstants.kOuttakePower),
            waitSeconds(0.25),
            setPowerZero()
        );
    }

    public CommandBase intake() {
        return sequence(
            setPower(ShooterConstants.kIntakePower),
            waitSeconds(0.25),
            setPower(ShooterConstants.kIntakeNeutralPower)
        );
    }
We created the shooter for the cube spammer in code, and then created an outtake command that waits 0.25 seconds to shoot before setting the power back to 0 so the cube-spammer is no longer outtaking. We also created an intake command which also waits 0.25 seconds before intaking the cube and then setting the power to neutral power, that way it is no longer intaking or outtaking.
Added Button Bindings
 commandDriverController.share().onTrue(Commands.runOnce(imu::zeroHeading));
    commandDriverController.options().onTrue(Commands.runOnce(swerveDrive::resetEncoders));
    commandDriverController.triangle().whileTrue(new TheGreatBalancingAct(swerveDrive));
    commandDriverController.circle()
      .whileTrue(Commands.run(() -> swerveDrive.setVelocityControl(true)))
      .whileFalse(Commands.run(() -> swerveDrive.setVelocityControl(false)));
    commandOperatorController.R1().onTrue(new InstantCommand(() -> wrist.moveWristMotionMagicButton((WristConstants.kWristGround))));
    commandOperatorController.R2().onTrue(new InstantCommand(() -> wrist.moveWristMotionMagicButton((WristConstants.kWristLow))));
    commandOperatorController.L1().onTrue(new InstantCommand(() -> wrist.moveWristMotionMagicButton((WristConstants.kWristMid))));
    commandOperatorController.L2().onTrue(new InstantCommand(() -> wrist.moveWristMotionMagicButton((WristConstants.kWristHigh))));
    upButton.whileTrue(new InstantCommand(() -> wrist.moveWristMotionMagicButton((WristConstants.kWristStow))));
We added button bindings to our cube-spammer code. We binded multiple commands to the buttons on the controller, including a low, mid, and high option for scoring, a ground button for intaking, a button for stowing the robot arm, a resetEncoder button, and a button for TheGreatBalancingAct, a command that balances the swerve drive on the charging station.
Autos
Cube Shooter Autos
During the offseason, we created 4 different autos for the cube shooter robot. To create these autos, we made an auto path using pathplanner and then created commands within RobotContainer.java to integrate the path planner autos into our program. Our four autos were 3PieceShort, 3PieceLong, DirectBalance, and Balance. They will each be explained in detail below. We also made a ShuffleBoard tab with a dropdown menu with which we can change the auto currently being used. Finally, to get rid of the lag that occurred at the beginning of each auto, we used hashmap to initialize the paths so that they built before the auto was run.
1. 3PieceShort Auto
The 3PieceShort auto involves scoring a preloaded cube onto the high node on the non-cable side, followed by two cubes onto the low nodes. This auto also includes mobility (taxi) as the two low cubes were picked up from the field.
2. 3PieceLong Auto
The 3PieceLong auto is essentially the same auto as 3PieceShort, but it occurs on the cable side of the field. The 3PieceLong auto involves scoring a preloaded cube onto the high node on the cable side, followed by two cubes onto the low nodes. This auto also includes mobility (taxi) as the two low cubes were picked up from the field.
3. DirectBalance Auto
The DirectBalance auto involves scoring a preloaded cube onto the high node in the middle of the grid. The robot then engages on the charge station.
4. Balance Auto
The Balance auto is similar to the DirectBalance auto, except that it taxis before engaging on the charge station. The Balance auto involves scoring a preloaded cube onto the high node in the middle of the grid. The robot then taxis and engages on the charge station.
Code Segments
The code block shown below turns each auto path into a command that can be accessed and chosen within Shuffleboard.
private void initAutoChoosers() {
    final String[] paths = {
       "3Piece Short","3Piece Long","Balance","DirectBalance"
    };

    PathPlannerAutos.init(swerveDrive);

    for (String path : paths) {
      PathPlannerAutos.initPath(path);
      PathPlannerAutos.initPathGroup(path);
    }

    autoChooser.addOption("Do Nothing", Commands::none);
    autoChooser.addOption("Path Planner Balance", () -> new Balance(PathPlannerAutos.autoBuilder, swerveDrive, shooter, wrist));
    autoChooser.addOption("Path Planner 3PieceShort", () -> new Auto3PieceShort(PathPlannerAutos.autoBuilder,swerveDrive, shooter, wrist));
    autoChooser.addOption("Path Planner 3PieceLong", () -> new Auto3PieceLong(PathPlannerAutos.autoBuilder, swerveDrive, shooter, wrist));
    autoChooser.addOption("Path Planner DirectBalance", () -> new DirectBalance(PathPlannerAutos.autoBuilder, swerveDrive, shooter, wrist));

    ShuffleboardTab autosTab = Shuffleboard.getTab("Autos");

    autosTab.add("Selected Auto", autoChooser);
  }
The code block shown below includes the hashmap initialization that allows us to build autos before they are run to prevent lag.
public class PathPlannerAutos {
    private static HashMap<String, PathPlannerTrajectory> cachedPaths = new HashMap<>();

    /**
     * Load the selected path from storage.
     * @param pathName
     */
    public static void initPath(String pathName) {
        if (cachedPaths.containsKey(pathName)) {
            DriverStation.reportWarning(String.format("Path '%s' has been loaded more than once.", pathName), true);
        }

        PathPlannerTrajectory path = PathPlanner.loadPath(pathName, kPPPathConstraints);

        if (path == null) {
            DriverStation.reportWarning(String.format("Path '%s' could not be loaded!", pathName), true);
        }
        cachedPaths.put(pathName, path);
    }

    public static PathPlannerTrajectory getPath(String pathNameString) {
        if (!cachedPaths.containsKey(pathNameString)) {
            DriverStation.reportWarning(String.format("Path '%s' was not pre-loaded into memory, which may cause lag during the Autonomous Period.", pathNameString), true);
            initPath(pathNameString);
        }
        return cachedPaths.get(pathNameString);

    }
}